Friday 30 March 2012

"The best biscuits I've ever tasted"... Peanut butter chocolate pillows

Since embarking on the vegan project, I've been almost overwhelmed with the positive reaction from vegan colleagues, who have made a real effort to stimulate my development in this area (with something of a focus on the confectionary side of things... I can't imagine why!) A couple of weeks ago, I found two cookbooks on my desk - one full of vegan cookie recipes and one full of vegan cupcake recipes. Thanks very much Steve and Tom! 

Since I don't really make that many cookies, I thought that would be a good place to start, especially since the ingredients for this one are all store-cupboard essentials. It's the kind of recipe that you can just knock up if you fancy a snack.

And yes, they are delicious indeed. In fact, whilst I'm personally not given to the use of superlatives unless absolutely necessary, I have been informed by three of my loyal testers that these were "the best biscuits I've ever tasted". Pretty high praise, eh? Maybe you should give them a go! They can be a little bit sticky and stodgy to make - try and keep your hands as cool as possible by running them under the cold tap before you get going. The recipe below is my slightly amended version, with the official version given in brackets afterwards.


Peanut butter chocolate pillows
from Vegan Cookies invade your cookie jar
makes about 18-20 (book reckons 24)

Ingredients:
For the chocolate dough:
1/2 cup sunflower oil (canola oil)
1 cup sugar
1/4 cup golden syrup (maple syrup)
3 tblsp soya milk
1/2 tsp vanilla extract
1 1/2 cups plain flour
1/3 cup plus an extra tblsp cocoa powder
1/2 tsp baking soda
1/4 tsp salt

For the filling:
3/4 cup peanut butter - crunchy crunchy crunchy. None of that smooth nonsense!
2/3 cup icing sugar
2-3 tblsp soya milk
1/4 tsp vanilla extract

1. In a large bowl, mis the oil, sugar, maple syrup, milk and vanilla until smooth. then sift in the cocoa powder, baking soda and salt. Mix to form a moist dough.

2. Make the peanut butter filling in another bowl, by beating together all of the ingredients to make a moist but firm dough. The moisture content of different peanut butters varies, so if your mixture is too dry/crumbly, then add a little bit more mik, and if it's too wet, knead in a bit more icing sugar.

The official version
3. Preheat oven to about 170 degress celsius.

4. To shape the cookies, make about 20 little balls of equal size from the peanut butter dough.

5. for each cookie, take a decent dessertspoon of chocolate dough, roll into a rough ball then flatten into a disc. Pop a peanut ball in the centre, then fold the sides of the chocolate dough up and around the peanut butter centre. Plop onto a lined baking sheet (or a silicon baking sheet), with the 'join' at the bottom.

6. Set out the cookies about 3-4cm apart on your baking sheets (you will probably need two). Bake for abour 10 minutes. Let them stand for abour 5 minutes before putting onto cooling racks.

Yeah, baby! Big crunchy chunks of peanut in the filling. Om nom nom nom!

Thursday 29 March 2012

Spring has sprung!

Although I am still resolutely vegan for the remainder of lent, I interrupt the vegan-ness of my blog in recent times to present the following cake that Mr P and I just made for my mother-in-law's birthday:


It's adapted from the perfect Madeira recipe - adaptations being that I used no lemon zest in the mixture, instead relying on a teaspoon of vanilla extract and half a teaspoon of rosewater in the sponge. It is filled with a white chocolate buttercream, and covered in sugarpaste leaves and flowers - roses, carnations and daffodills.
There's not much more to say on that account, and they say a picture is worth a thousand words, so here's a bit of a photographic essay for you...


Happily for my husband and colleagues, not only did the cake rise epically (meaning I was left with a fair amount of sponge that I'd sliced off the top) but I was also left with quite a bit of white chocolate buttercream. Enter the food processor. Some blitzing, mixing, rolling and chocolate-covering later, and the result was these cute little cake pops. Although my resolution decrees that I can't try them myself, the reaction around the office has been pretty darn positive. Plus, they look very cute, don't they?!

... and covered in chocolate...
Blitzed, mixed, rolled and chilled...
...and ready to serve!


Saturday 17 March 2012

Kimchi or not Kimchi... that is the question!

Cabbage is a bit of a sore point in our household, since Mr P is practically phobic. I have just about managed to get him to eat the odd sprout, stirfried in a flash in a spicy sauce, but cabbage remains a major task. And since we get a fortnightly box of mystery seasonal veg delivered to our house, cabbage has featured rather heavily of late, and it's been my sole responsibility.

A colleague introduced me to Korean food recently, and I got very excited googling the various exotic options on the menu. Most intriguing was the idea of Kimchi - apparently a staple of Korean cuisine that often involves fermented cabbage, ginger and chilli. Fish sauce is normally a key ingredient in Kimchi, but I wasn't going to let this put me off  the possibility of a solution to the cabbage overload I've been having of late. If you're a meat-eater or a pescetarian, you could substitute fish sauce for half of the soy sauce in the recipe. However, for vegetarians/vegans, my recipe is probably so different from its namesake, that I'm not sure if it's fair to stick to the original name. But as I can't think of anything more suitable (and as it's provided me with a puntastic title for this post), I think we're good to go.

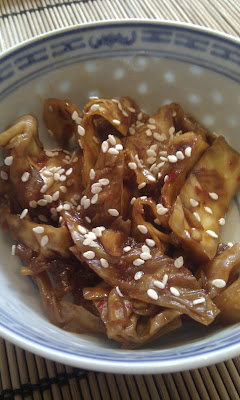
Kimchi (or not Kimchi)
Ingredients:
2 large cabbages
8 dessert spoons salt
1 red onion, finely minced
4 cloves garlic, finely minced
5 tblsp lazy chilli (the kind pre-chopped in a jar)
about 2cm fresh ginger, grated
10 des sp soy sauce
3 tsp sugar


Method:
1. Chop the cabbages in half, then chop into pieces about 2cm in size, then rinse.

2. Put the cabbage into a large container, dissolve the salt in a jug of water and pour over the cabbage. You will then have to top up with more water until your cabbage is totally covered (unless your jug was gargantuan). Weigh the cabbage down so that it is completely submerged. Leave for 4-5 hourse, then drain, rinse and dry.

3. For the sauce, mix together the onion, garlic, chilli, ginger, soy sauce and sugar.

4. Cover the cabbage completely in the sauce, and pack into sterlised jars. Invert a couple of times, then pop into a cupboard for a couple of days, after which it should be starting to ferment and ready to serve. In normal kimchi, this is indicated because it starts bubbling, though this never happens to mine. Transfer the kimchi to the fridge.  If you don't want to eat it straight away, you can leave it to mature for longer. It will get richer and more sour over time, and then is better used as the base for sauces and soups rather than eaten on its own.

5. The kimchi is lovely served with sesame seeds, either as a snack on its own, with noodles as a simple lunch, or as a side to many different kinds of dishes. But don't get carried away and eat a whole jar in a couple of days, as a certain friend of mine recently did - your belly won't thank you for it! It is fermented cabbage, after all.


Sunday 11 March 2012

Gnocchi... fantastico!

Gnocchi really is the ultimate comfort food. Just the right amount of substance, and the right amount of stodge, and versatile enough to take on the flavours of whatever you choose to serve it with. Plus it's very simple and quick to make. And I don't mean "drop the shop-bought gnocchi into a pan of boiling water, wait 3 minutes and scoop them out". It takes less than 40 minutes to prepare gnocchi from scratch, and it's definitely worthwhile. Apparently they are sometimes made using egg, but I find that my eggless version works perfectly well, so it's a great vegan option.

My friend A came to visit today. She's an established 'hater' in the kitchen, but she's been getting more and more interested in cooking of late. And when she saw just how simple it is to knock up a batch of these bad boys, she was well and truly converted. I'm sure you will love them too!

Theoretically, it's worth making a big batch of these at once, and keeping any that you don't need in the fridge, with a dusting of flour, to cook the following day (or you can freeze them). However, I have found that no matter how many I make, it only seems to feed the number of people present, and there are never any leftovers!


Gnocchi in a light leek and sage infused sauce
serves 3-4

Ingredients:
for the gnocchi:
3 large floury potatoes
3 tablespoons white bread flour
1 tablespoon olive oil
pinch salt and pepper

for the sauce:
1 clove garlic, finely chopped
1 large leek, chopped into thin rings
2 tblsp olive oil
scanty handful fresh sage, roughly chopped
pinch salt and pepper

Method:
1. Chop the potatoes roughly into similar-sized pieces (roughly into thirds). Boil for about 25 minutes until they are almost completely cooked.

2. Drain the potatoes, and allow to rest until cool enough to handle. Then peel off the skin.
I hate waste, so I always drizzle the skins with olive oil, salt and pepper, and bake in the oven for 15 minutes until they become crispy.

3. Mash the potatoes roughy in a large mixing bowl. You want to get rid of any big lumps, but you still want a good texture.

4. Mix the flour and the olive oil into the mashed potato, then turn out onto a lightly floured surface, and knead for a couple of minutes until smooth-ish.

5. Roll out the dough into a long sausage shape, about a couple of centimetres thick.

6. Cut into sections about 2cm in width, then use a fork to gently indent one side of each of your gnocchi (this gives a good surface for your sauce to settle into).

7. Drop the gnocchi into a pan of boiling water. When the float to the surface they are done. This only takes about 3 minutes, so you will need to move fast to prepare the sauce...

8. Gently heat half of the oil in a frying pan and add the garlic, sage and the leek, until they soften. At the last minute, add in the salt and pepper and the rest of the oil and heat through for about 30 seconds.

9. Remove the gnocchi from the boiling water with a slotted spoon, and drizzle with the garlic and leek infused oil. Serve immediately.


Saturday 10 March 2012

In the jungle...


This week's cake decorating theme... jungle animals. 'Nuff said.


Saturday 3 March 2012

Bird in a Bird in a Bird

I'm not really sure what the official name for the inspiration behind this dish is, and to be honest, the whole idea makes me feel a little queasy - the traditional Christmas practice of stuffing a small bird inside a bigger bird, inside another big bird. But I did think that it would be a good idea to try making something that spectacular, using vegan ingredients. In my opinion, this looks a lot more appealing than its namesake as when you cut it you get rainbow slices on your plate - delicious!


Bird in a Bird in a Bird
with potato wedges and hot tomato gravy
(serves 4)

Ingredients:
1 large butternut squash
2 red peppers
1 medium-sized aubergine
couple of handfuls of spinach, washed
1 large courgette
1 cup red camargue rice
tsp cumin
olive oil
sea salt
pepper

For the simple bechamel sauce:
1 tblsp spoon olive oil
3 tsp plain flour
3 tblsp soya milk
very scanty pinch nutmeg

For the hot tomato gravy:
1 tin tomatoes
1 small red onion, finely chopped
1 Scotch bonnet chilli, very finely chopped
3 cloves garlic, crushed or very finely chopped
10 olives
pinch pepper

Method:
1. Preheat your oven to 200 degrees celcius. Chop the butternut squash in half, scoop out the seeds and place the squash cut-side down on a baking tray, with about 1cm of hot water in it. Pop in the oven for 20-30 minues until the flesh is tender.

2. Meanwhile, cook the rice on the hob in the usual way. I use 2 cups of water for 1 cup of rice, boil it rapidly for 3-5 minues, then turn off the heat and leave the pan there with the lid on for 20 minutes. Perfect results every time.

3. Slice the aubergine into thin slices and either grill, griddle or fry until soft and ever so slightly charred, then set aside. Whilst you are doing this, submerge your peppers in a jug of water for about 5 minutes, then remove them and pat dry. This makes the skin nice and tender.  

4. Your butternut squash and rice should now both be ready. Remove the squash from the oven, and turn the oven up to 220 degrees celcius. Use a spoon to scoop out most of the flesh from the middle, leaving about 1cm of flesh around it so that the skin doesn't fall apart. Mix the flesh into the rice, adding salt and pepper to taste. Stuff some of the rice mixture well into the prepared red peppers (you will probably need just over half of it), brush the outside of them with a little olive oil, and sprinkle with salt. Cut the courgette in half, brush the outside with oil and sprinkle with salt. Pop the peppers and the courgette in the oven for 10 mins for the peppers to brown off the outside andt the courgette to start to cook.

5. Whilst they are in the oven, make a very simple bechamel sauce, by heating the oil and flour over a gentle heat, stirring continuously. Then add the milk, stirring continuously. Add the nutmeg at the last minute and stirr well. There won't be much sauce, but it should be pretty thick.

6. Line the cavity of the butternut squash with the slices of aubergine so that there are no gaps, but the lining is quite flat and neat. Spoon half of the bechamel sauce into each half of the squash, and spread evenly so that all of the aubergine is covered.

7. Remove the peppers and courgettes from the oven, and reduce the temperature to 200 degrees celcius. Pop the stuffed peppers into on half of the butternut squash. You may have to manipulate them a little to make them fit, but this is fine. Put the squash back together, brush the outside with a little olive oil, some sea salt and pepper, and pop back on your baking tray.

8. Scoop the very centre from your courgette,discard any seeds, and mix the rest of the flesh in with the remainder of the rice mixture. Line the cavity of your courgette with the spinach.

9. Add the cumin to the rice and mix in well. Use this to stuff the two halves of the courgette. There will probably more than you need, but this can be frozen for a lunchbox at a later stage. Once the courgette is stuffed, put it back together, cover the outside in a thing brushing of olive oil, sea salt and black pepper then put back on the baking tray. Pop both of the stuffed 'birds' back in the oven for around 40mins.

10. Meanwhile, make the tomato gravy. Gently fry off the onion in a little olive oil until it starts to go soft, then add in the garlic, chilli and  tomatoes. Bring to the boil, then simmer very gently for about 40 minutes to allow the sauce to thicken and mature. You might want to open a window at this point, as the chilli fumes can be quite intoxicating!

11. You can now prepare the potato wedges to serve with the meal. Take three large potatoes and chop each in half length-ways, then cut each half lengthways into three or four equal segments. Put these on another baking tray, drizzle with olive oil, sprinkle with salt and pepper and pop them in the oven when the 'birds' have been in for about 20 minutes, so that they are ready at the same time. You will need to give the wedges a good shake around about ten minutes into their cooking time.

12. When you put the wedges in the oven, you can add the olives to the tomato gravy. You can cut them in half if you like, or keep them whole for texture - whichever you prefer.

Slice the 'birds' at the table for best effect!
When everything is ready, dish up the wedges, but leave the 'birds' for carving at the table for some added excitement. Serve the sauce in a jug, so that guests can decide how brave they want to be! Although the sauce is pretty hot, it's actually shockingly more-ish...