Showing posts with label Madeira cake. Show all posts

Monday, 5 November 2012

P...p...p...pick up a penguin!

One of the great things about being known as a fan of baking and cake decorating, is that I fairly often get asked by friends to make cakes for special occasions in their families. I always love it when this happens - there's only so much sugarpaste Mr P and I can eat, so having a good excuse for an artistic project for somebody else is always welcome.
 
Most recently, I was asked to create a small wedding cake as a surpise for a friend's sister- and brother-in law. I was told that the bride and groom were both big fans of cocktails, and that the wedding invitations had been sent out on reproductions of the title pages of Penguin romantic classics. What a great brief, eh?
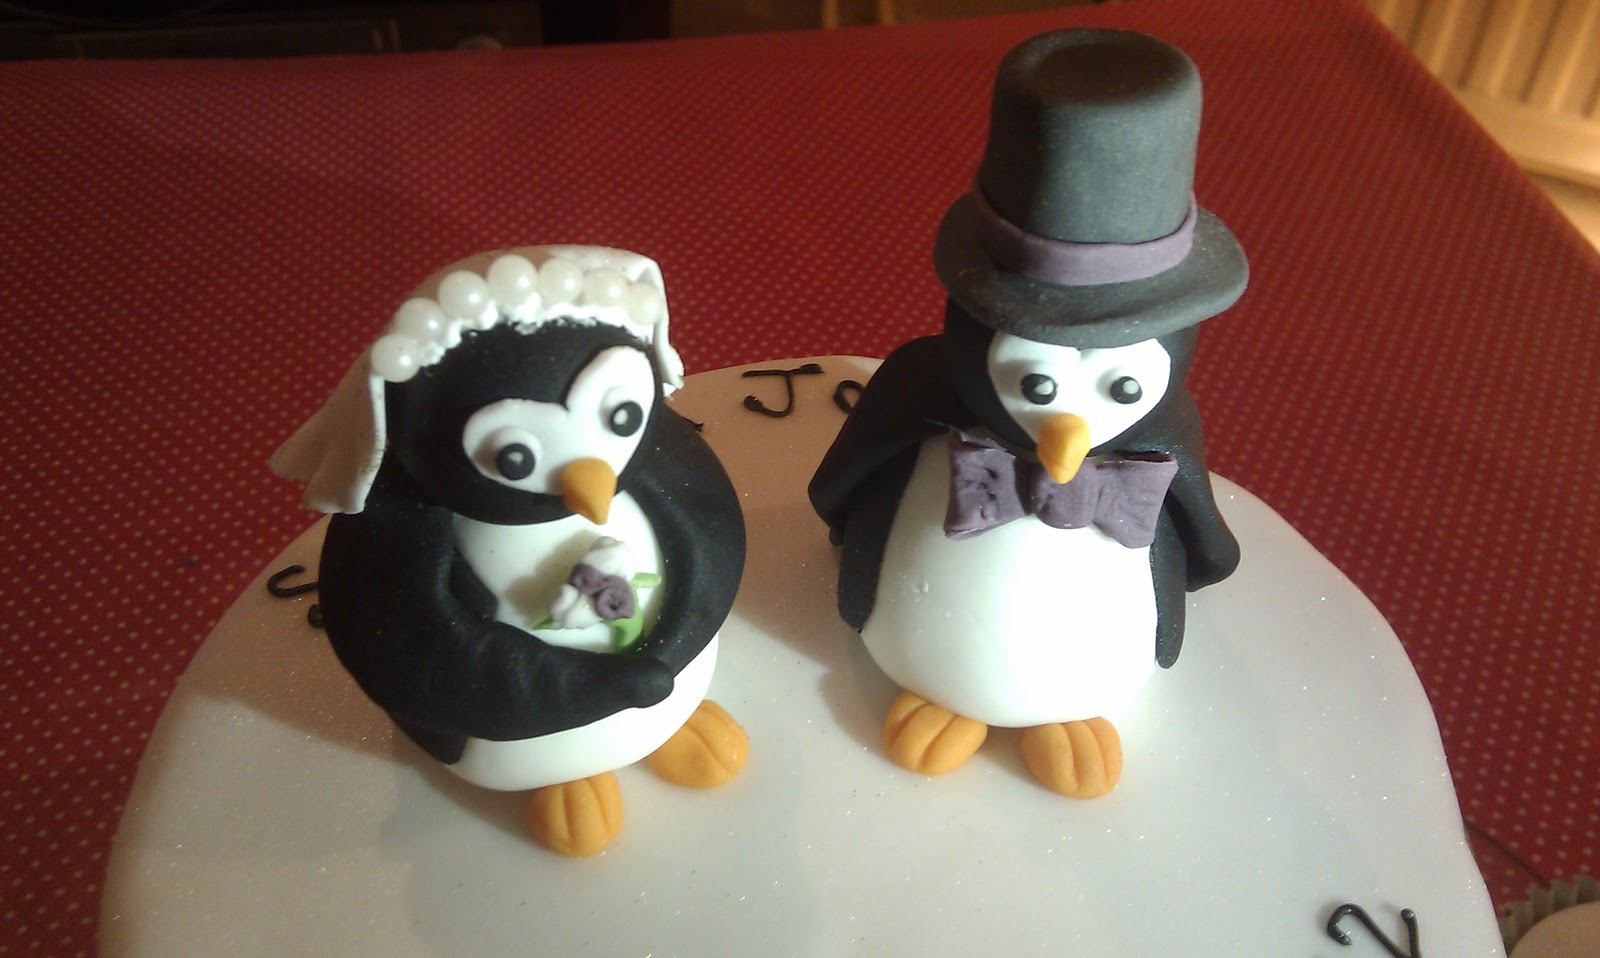
 
Penguin cake topper
 
So the final product was a strawberry daiquiri-flavoured cake (lime and rum sponge sandwiched with home-made strawberry jam and strawberry and rum buttercream). With the help of my trusty pal Mel (who is experienced in the subject of sugarpaste penguins!) it was decorated with detailing from one of the book covers, and a penguin bride and groom cake topper.


Penguin wedding cake


The summer saw a couple of other good projects to get my teeth into. Mr P's Nan celebrated her 80th birthday in August with a big family get-together, so we decided to make up a batch of cupcakes to keep all of the guests satisfied. As well as a traditional lemon flavoured batch, we came up with a very popular cupcake flavour - tea and biscuits! This was done by brewing a tea bag in a dah of warm milk, and adding the milk together with just a smidgin of cocoa powder to a fairly standard sponge mix. Simple and effective! This left us with plenty of energy to focus on decorating all of the cupcakes.


And finally, last but not least, a friend of mine recently wanted to surprise her Mum, 'Dove', with a celebration cake for her 60th birthday. As her mother had somehow managed to sleuth out each and every one of her other birthday surprises, I was especially happy to be involved in this. And happily, the first she knew of it was when the cake turned up in front of her at the end of the evening!


Sunday, 15 April 2012

Through the looking glass...

This week saw the 'final project' of my cake decorating class. Having been ridiculously excited about this for weeks and weeks, I may have come up with a slightly over-ambitious project. In the end, it took longer than the two-and-a-half hour session to decorate this cake (quite a lot longer, actually!) but I got the chance to create the semi-gothic wonderland I've been dreaming about since the project was announced, and which has resulted in 'research' in the form of Tim Burton's Alice in Wonderland, and much time spent on google images.


Mel hosted a 'cake unveiling' yesterday, with the hope that, with help, we could limit the calorific damage of two gargantuan sugarpaste creations. However, even with the best efforts of friends and colleagues, we barely made a dent in the mountains of cake required to support the sugarpaste creations.

Ah, well. It'll be cake all round in the office next week...


Alice in wonderland cake/
White chocolate and raspberry rainbow cake with white chocolate buttercream

10" cake - provides about 30-40 servings.

Ingredients:
500g margarine (I used Stork)
500g caster sugar
500g self raising flour, sifted
250g plain flour, sifted
9 large eggs, beaten
1 tsp vanilla extract
1 orange - zest only
multicoloured sugar sprinkles
100g white chocolate, roughly chopped into chunks

For the filling:
4 tblsp raspberry jam.  I used raspberry and vanilla jam by Relish. Pricy but scrumptious!

175g unsalted butter, softened
500g icing sugar
90ml milk/soya milk
1tsp vanilla extract
200g white chocolate

To decorate (optional):
1kg sugarpaste icing, to cover (optional)
Plus extra for decorations of your choice

Method:
1. Grease and line your cake tin, and wrap four of five layers of newspaper around the outside of your cake tin. This will help it to bake evenly, without the outside edge burning.

2. For the cake, cream together the margarine and sugar until the mixture becomes creamy and white.

3. Gradually stir in the egg a little at a time. If the mixture begins to curdle, add in a little of the flour (a tablespoon at a time) to stop this happening. Keep adding the egg, little by little.

4. Coat the white chocolate chunks in some of the flour, and gradually mix in the remaining flour, white chocolate and orange zest. At the last minute, stir in the coloured sugar strands. These will give the inside of your sponge a rainbow effect. Spoon the mixture into the prepared tin, leaving a big hole in the centre. This will fill itself in as the cake rises.
5. Bake the cake at 160 degrees celcius (145 degrees celcius if it's a fan oven) for about 2-2.5 hours (checking after an hour and three quarters). Pop a bowl of water on the bottom of the oven as you bake, as this will help the cake to retain moisture. Also, put a baking sheet on the shelf on top of the cake, to protect it from the heat a little. If you feel the cake is browning too much on top, you can cover it with tin foil. The cake is done when a skewer inserted into the middle comes out clean.

6. When the cake is completely cool, you can trim it to ensure it is completely flat (the trimmed top will be made into the bottom of the cake), slice it in half and prepare the filling. Gently heat the white chocolate in a bain marie until it is completely melted. Set it aside to cool slightly as you prepare the rest of the buttercream.

7. Whisk together the butter, icing sugar and vanilla extract wth a hand whisk. Gradually pour in the milk as you are whisking, but take care not to overwhisk the mixture. Pour in the cooled, melted white chocolate, and stir with a spatula until mixed together. Then whisk until the buttercream has a light, fluffy consistency, adding a tablespoon or so or extra milk if necessary.

8. Spread the raspberry jam on one half of the cake, and spreadthree quarters of the buttercream on the other half. The place the two halves together, buttercream and jam facing inwards.

9. Use a palette knife to spread the rest of the buttercream around the top and sides of the cake. If you are not using sugarpaste, then sprinkle with some multicoloured sugar strands and serve. Otherwise, the buttercream gives a smooth surface for your sugarpaste icing to stick to.

10. If using sugarpaste, roll out to the desired thickness and cover the cake, smoothing carefully. This cake will keep in an airtight container in a cool room for a good week. Do not keep it in the fridge, or the chocolate in the buttercream will set like concrete!

The hot day was making Alice feel sleepy...


 "Oh dear, I shall be too late!" exclaimed the white rabbit.
"Why is a raven like a writing desk?", asked the hatter.
"Off with their heads!"


"You're nothing but a pack of cards!", cried Alice...


... and she found herself lying back on the bank...


... so she closed her eyes, and half believed in wonderland.

Thursday, 29 March 2012

Spring has sprung!

Although I am still resolutely vegan for the remainder of lent, I interrupt the vegan-ness of my blog in recent times to present the following cake that Mr P and I just made for my mother-in-law's birthday:


It's adapted from the perfect Madeira recipe - adaptations being that I used no lemon zest in the mixture, instead relying on a teaspoon of vanilla extract and half a teaspoon of rosewater in the sponge. It is filled with a white chocolate buttercream, and covered in sugarpaste leaves and flowers - roses, carnations and daffodills.
There's not much more to say on that account, and they say a picture is worth a thousand words, so here's a bit of a photographic essay for you...


Happily for my husband and colleagues, not only did the cake rise epically (meaning I was left with a fair amount of sponge that I'd sliced off the top) but I was also left with quite a bit of white chocolate buttercream. Enter the food processor. Some blitzing, mixing, rolling and chocolate-covering later, and the result was these cute little cake pops. Although my resolution decrees that I can't try them myself, the reaction around the office has been pretty darn positive. Plus, they look very cute, don't they?!

... and covered in chocolate...
Blitzed, mixed, rolled and chilled...
...and ready to serve!


Sunday, 5 February 2012

The zombies are coming...

Ladies and gents, I have a confession to make. For the past few weeks I have been living a lie: having furtive sessions of secret activities, leaving the office early for each rendez-vous, making up pathetic lies to cover my tracks. To be honest, it's a relief that the whole charade is over.

And what have I got to show for it?

The most head-bending sugarpaste bonanza you could possibly wish to encounter outside of the context of 'Ace of Cakes'! Let me proudly present a birthday cake tribute to the epic computer game 'Plants versus Zombies'.


In case you're not familiar with the game, here's what the garden is supposed to look like:


Massive thanks go to the lovely M for assisting with this - it was well and truly a joint effort. Without her innate sense of German engineering, it's doubtful that the figures would have come out as structurally sound as they did. And without the use of her facilities there's no way my lies would have gone undetected for so long.

All that remains to say is: Happy Birthday Husband... The Zombies are Coming!


Totally tropical celebration cake
Makes one 9" x 12" cake, about 4.5" deep

Ingredients:
740g caster sugar
740g Stork/ baking margarine
740g self raising flour, sifted
370g plain flour, sifted
13 eggs, beaten
zest of 6 limes

Frosting:
250g unsalted butter, softened
120g icing sugar, sifted
125g creamed coconut
tablespoon rum

For finishing:
Half a jar of apricot jam
About 500g sugarpaste icing

Method:
1. Grease and line your tine - best to triple line it if you can, and to wrap the outside in four or five layers of newspaper to stop the outsides cooking too fast and burning. Preheat the oven to about 155 degrees celcius

2. Cream together Stork and sugar. Very slowly mix in the beaten egg. If you do it too quickly and it starts to curdle, add in just as much of the flour as you need to stop it curdling.

3. Stir in all the rest of the flour.

4. Put the mixture in your tin, scooping out the middle to leave a hole (this will get filled in as the cake cooks).

5. Bake for about 1h45mins to 2hrs, until a skewer comes out clean. Cool on a cooling rack.

6. When the cake is completely cooled, cut off any excess necessary so that the top is pretty much even and flat. Then turn the cake upside down so that the perfectly flat side becomes the top, and the cut bit becomes the bottom. Cut the cake into two equal halves, horizontally.

7. Make up the buttercream, by whisking together all of the ingredients.

8. Spread about a third of your jam over the top of the bottom half of your cake, and spread the coconut buttercream on the bottom of the top half of your cake. Sandwich together.

9. Cover the outside of your cake with a thin layer of apricot jam to help the sugarpaste icing to stick to the cake.

10. Roll out your sugarpaste icing and use it to cover the cake, smoothing and trimming as you go. Decorate according to your own imagination!


Thursday, 18 August 2011

The story of the wedding cake (day 3)

Hurrah! The exciting day of construction and decoration has arrived!

1. I inserted dowel rods into the bottom two tiers to support the tiers to be placed above them, so that the sponge would not have to take the weight.  


2. I then inserted a long dowel rod through the centre of the bottom tier, which would act as a central skewer, keeping all three tiers securely together...


... then lowered the middle tier onto the rod...


... and then added the top tier.


I offset the tiers slightly to the back of the cake, so that there would be slightly more openness to the front of the cake.

3. I then made the final touches to the finish of the icing, smoothng and polishing it well.


4. Finally, the most fun part: decoration! Red and gold are the traditional colour for Hindu ceremonies, so I started with a sheer red ribbon to the bottom of each of the tiers, as this was a good way to tidy the joins between tiers without using piped royal icing. I thought this would give the cake a more contemporary feel.

5. I then started to add the gold leaves and red roses, using an edible glue adhesive. Some of the larger, heavier roses were more difficult to attach in this way, so I used royal icing. This seems to give a more sturdy hold even than purpose-made edible glue.   


6. I made a small mound of roses and leaves on top of the top tier, and then a small bunch of roses on opposite sides of the bottom two tiers - nothing too symmetrical, as I preferred a more natural look.

Here is the finished item.