Showing posts with label birthday cake. Show all posts

Monday, 30 September 2013

Rhubarb and Orange Cake

This month I got the opportunity to think outside the 'birthday box', since I wanted to make a cake for my friend Messner's birthday, and he ain't a sugarpaste kinda guy. It was also a rather big birthday, and since I spend so much of my time making up recipes as I go along, I thought I'd make a special effort to actually follow a real recipe. And had it not been for a minor shortage of ground almonds in my cupboard, I'd have managed it.

He's a big fan of rhubarb (who isn't?!) so that seemed an obvious place to start, and I found a great-sounding recipe in my BBC Good Food 101 Cakes and Bakes book.

It's a little involved, but the end result is magnificent, and you should really give it a go!

Here's the original BBC Good Food recipe (together with my very minor necessary amendment).

Rhubarb and Orange Cake

Ingredients:
350g/12oz prepared rhubarb, cut into 4cm lengths
200g/8oz golden caster sugar
finely grated zest and juice of half an orange
140g/5oz butter, softened
2 eggs, beaten
1/2 tsp baking powder
85g/3oz self raising flour
100g/4oz ground almonds
(I only had 75g/3oz ground almonds and it turned out fine!)

For the topping
25g/1oz butter, melted
25g/1oz light muscovado sugar
finely grated zest of half an orange
50g/2oz slivered almonds
icing sugar, for dusting (I totally forgot to do this)

Method:
1. Mix the rhubarb with 50g/2oz of the caster sugar and the orange zest. Leave for one hour, stirring a couple of times.

2. Preheat the oven to 190 degrees Celcius/gas mark 5/. Butter and line the base of a deep 9inch round cake tin. Cream thebutter and remaining caster sugar. Add the eggs, baking powder, flour and ground almonds. Beat gently, but don't overmix.

3. Stir in the orange, juice, spoon into the tin and level. Drain the rhubarb and spoon over the top. Bake for 25 minutes.

4. Meanwhile, combine the butter, sugar, zest and almonds.

5. Reduce the oven to 180 degrees Celcius/gas mark 4. Sprinkle the topping over the cake and return to the oven for 15-20 minutes or until firm.

6. Cool in the tin, then transfer to a wire rack.

7. Dust with icing sugar (or don't!), and serve warm with whipped cream, or just on its own with a cup of tea. Yum!

Friday, 20 September 2013

Simplicity defined - customisable cupcakes

I love a good cupcake. It's amazing when you have a tiny package of sugary perfection with unexpected treats hidden inside and lashings of frosting on the outside. It puts me in mind of a sucrose-loaded wonderland where all your diabetic dreams can come true.
 
But I also love an easy ride, and sometimes there's just not time to faff around with complicated recipes. At these times, I return to a trusted favourite - standard cupcakes 'like Granny used to make'. This was back in the days of pounds and ounces, which makes the recipe super easy to remember. In ounces, it's
 
The same of everything, and half as many eggs.
 
This simple mantra is a revelatory truth in the kitchen.
 
e.g. 2oz each of Sugar, butter and self raising flour, plus one egg.
 
It's easy to multiply up, and it's also very easy to customise. So here are some ideas and examples...


Classic cupcakes
 
Ingredients:
 
2oz (55g) unsalted butter
2oz (55g) sugar
2oz (55g) self raising flour
1 free range egg, beaten
 
 
Method:
 
1. Cream together butter and sugar.
 
2. Stir in the egg.
 
3. Fold in the flour.
 
4. Divide the mixture between 9 cupcake cases and bake for 20 minutes at 180 degrees Celsius/gas mark 4.
 
 
Customise those bad boys!
 
You want a classic chocolate cupcake? Remove a dessert spoon of the flour, and replace with two dessert spoons of cocoa powder.
 
You prefer a bit of chocolate fudge? Replace the caster sugar with muscovado sugar. And while you're at it, why not cut up some small chocolates, and plonk a lump of each into the centre of each cake!
 
Vanilla's more up your street? Well, be my guest and add a teaspoon of vanilla extract to your batter! Hell, if you're fancy, you can even scrape the seeds our of a vanilla pod instead and add those.
 
Want something delicate and fluffy - go for golden caster sugar instead of the standard stuff!
 
Fancy a bit of fruit? Stir a spoonful of berries or jam through your batter before spooning it into the cupcake cases! Or stir in half the juice and the grated zest of an orange, lemon or lime (save the rest of the juice to make up a simple icing with icing sugar).
 
 
Get decorating
 
Batman cupcakes
Go for a simple icing of icing sugar and water, or icing sugar with fruit juice (and colouring for a bit of a change). Whilst it's wet, you can add whatever jellies or sprinkles you fancy.
 
Add a thin layer of melted chocolate - super simple! And why not chuck on some mini eggs for giggles?! Another variant of this is to melt Mars bars in a bain-marie, and spread the resulting fudgey gloop over the top of your cupcakes. Yum.
 
Load it up with a fancy ganache or a simple buttercream (see here) or if you're feeling lazy, you could always try a shop-bought frosting - though I have to admit when I tried Betty Crocker's chocolate fudge, I was pretty darn disappointed. You can use custom-made (non-edible) decorations for super-speedy decorating.
 
Get creative with sugarpaste - the key to effective sugarpaste tops is to simplify ideas to their component parts and that way you'll have really eye-catching designs. I made some chocolate fudge cupcakes for a friend's recent Batman-themed birthday party, and based the tops on the motifs and costumes of some of the characters from the comics.
 

Batman cupcake
Robin cupcake
Joker cupcake


Harvey Dent/Twoface cupcake


Poison Ivy cupcake
Harley Quinn cupcake


Sunday, 3 February 2013

Welcome... to the Crystal Maze!


Aztec zone
So, although I realise my posting has been more than a little sporadic of late, I hope that this sweet little treat will make up for the radio silence. And let me tell you this. It’s a mega treat. Because, it’s that time of year again – Mr P’s birthday!

Those of you with good memories will recall that last year’s birthday celebrations provided my decorating pal Mel and I the perfect opportunity to get creative with a surprise cake based on the Plants Vs Zombies computer game, which completely blew him away. This year, we gave him a bit of a say in the creative process – to decide either the theme or the flavour. After much serious deliberation (or perhaps it was a gut reaction, since he’s been very busy applying for jobs at the moment), Mr P declared that he’d like a chocolate fudge cake.
I am utterly indebted to the marvellous Lindy’s cakes for the recipe I used – you can find their original recipe post here. Flavour-wise, Mel and I agreed that this is probably the best cake we’ve ever made. And as you probably know, I’m not a major chocolate fan, and she doesn’t have much of a sweet tooth at all, so that says a lot about the recipe. Presumably the deliciousness of the cake is inversely proportional to its  healthiness, seeing as it contains roughly a bucket of butter, chocolate and sugar and a comparative sprinkling of flour. But who am I to argue with perfection?! This cake is super moist, and stays moist very well, and is sure to go down well for any occasion.
Crystal Maze cake
 

Medieval zone
Richard O'Brien in sugarpaste form


As for the theme, it’s based around one of Mr P’s favourite TV shows from childhood, The Crystal Maze. I haven’t seen any other Crystal Maze cakes online, so it felt like a very original project. There are four separate 5” square cakes, each representing one of the four challenge regions from the original show – Aztec, industrial, futuristic and medieval. The research process consisted of spending two hours of my life (that I am well aware I will never get back) watching old episodes online, whilst screaming at the screen and genuinely wondering if the contestants came from another species altogether. If you don’t value your sanity, knock yourself out here 

The industrial zone
The futuristic zone


Super moist rich chocolate fudge cake
Recipe from Lindy’s cakes
This makes 4 x 5” square cakes; for one 8” round cake, just halve the quantities given below.

Ingredients:

450g (16oz) unsalted butter
450g (16oz) good quality chocolate
2 tablespoon (30ml) instant coffee granules
450g (1lb) caster sugar
450g (1lb) light soft brown sugar
300ml (10 fl oz) water
8 large free range eggs
70ml (2.2fl oz) rapeseed oil (Lindy uses veg oil, but I think rapeseed is less detectable, and healthier too!)
200ml (6.8 fl oz) sour cream/natural yoghurt/Crème fraiche
250g (9 oz) self raising flour
250g (9 oz) plain flour
100g (4oz) cocoa powder
1 teaspoon (5ml) bicarbonate of soda


Method:
1. Preheat your oven to 160 degrees celsius (315 degrees F, gas mark 2-3) and line your tin/tins with baking parchment. I also like to line the outside of the tins with a few layers of newspaper as it helps the cakes to rise with a more even, rather than domed top (even though it adds to the cooking time a little). This is more important if you’re decorating with sugarpaste, but if you’re going for a more rustic look, then it’s not such a big deal.
 
2. Add the butter, chocolate, coffee, sugar and water to a pan and slowly melt together over a low heat. I know the idea of adding the chocolate and water rings alarm bells, but you just have to keep the faith here. Once these ingredients have melted together, melted allow to cool.
 
3. Add the beaten eggs, oil and sour cream to the chocolate mix and stir well.
 
4.Sift all the dry ingredients into a large mixing bowl and make a well in the centre.
 
5. Pour the chocolatey liquid mixture into well and stir in the dry ingredients, mixing well until thoroughly combined.
 
6. Pour the cake mixture into your tins and bake for about 1hr 30mins (1 hour 45mins-2hrs for an 8” round) or until a skewer inserted into the centre of the cake comes out clean.
 
7. Place the tin on a cooling rack, and leave the cake to cool inside it.
 
To finish and decorate:
This cake is so rich and moist that it doesn’t really need to be cut and sandwiched with buttercream. In fact, it tastes so rich and moist that even without any topping you it still tastes great.

A chocolate ganache might be overkill on a cake like this, but I think a vanilla or chocolate buttercream, or even a cream cheese frosting would work pretty well on top. In my case, I made some mild chocolate buttercream (not very chocolatey and not particularly sweet) – just enough to create a crumb layer on top. Then I covered the cakes with a layer of sugarpaste and finished with sugarpaste decorations.

Monday, 5 November 2012

P...p...p...pick up a penguin!

One of the great things about being known as a fan of baking and cake decorating, is that I fairly often get asked by friends to make cakes for special occasions in their families. I always love it when this happens - there's only so much sugarpaste Mr P and I can eat, so having a good excuse for an artistic project for somebody else is always welcome.
 
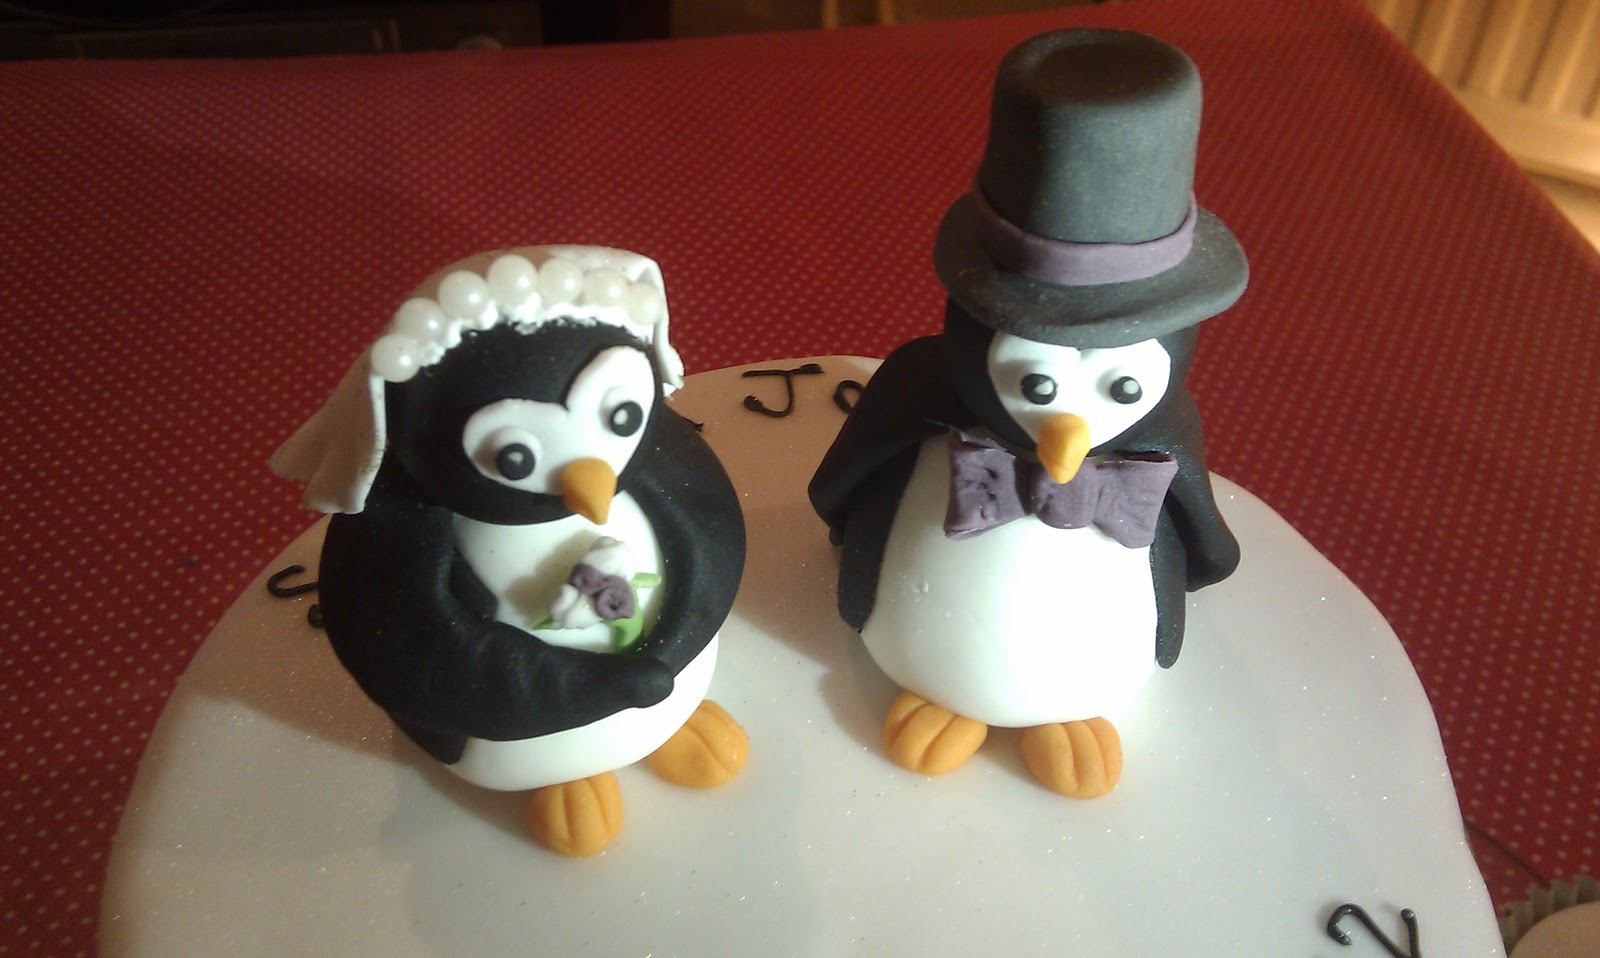
Most recently, I was asked to create a small wedding cake as a surpise for a friend's sister- and brother-in law. I was told that the bride and groom were both big fans of cocktails, and that the wedding invitations had been sent out on reproductions of the title pages of Penguin romantic classics. What a great brief, eh?
 
Penguin cake topper
 
So the final product was a strawberry daiquiri-flavoured cake (lime and rum sponge sandwiched with home-made strawberry jam and strawberry and rum buttercream). With the help of my trusty pal Mel (who is experienced in the subject of sugarpaste penguins!) it was decorated with detailing from one of the book covers, and a penguin bride and groom cake topper.


Penguin wedding cake


The summer saw a couple of other good projects to get my teeth into. Mr P's Nan celebrated her 80th birthday in August with a big family get-together, so we decided to make up a batch of cupcakes to keep all of the guests satisfied. As well as a traditional lemon flavoured batch, we came up with a very popular cupcake flavour - tea and biscuits! This was done by brewing a tea bag in a dah of warm milk, and adding the milk together with just a smidgin of cocoa powder to a fairly standard sponge mix. Simple and effective! This left us with plenty of energy to focus on decorating all of the cupcakes.


And finally, last but not least, a friend of mine recently wanted to surprise her Mum, 'Dove', with a celebration cake for her 60th birthday. As her mother had somehow managed to sleuth out each and every one of her other birthday surprises, I was especially happy to be involved in this. And happily, the first she knew of it was when the cake turned up in front of her at the end of the evening!


Thursday, 25 October 2012

Extra special chocolate layer cake

As a rather lazy baker, I tend to prefer recipes that call for few ingredients and simple instructions. So if I had read the recipe fully before starting this chocolatey scrumpster, then if I'm honest, I may well not have bothered. But that would have been a major loss.

Although this cake takes a little extra time and care than your average chocolate layer cake, it's really very much worth it. this cake is perfect or a social occasion, and it really shows that you care. It's rich but light, moist, delicious, and you can taste that extra bit of care and attention that go into it. Plus, it freezes like a dream, so if you're feeling inspired, you can make a double batch and have one on standby. Not bad, eh?!

The sponge recipe itself is adapted from the Chocolate Layer Cake recipe in Cupcakes from the Primrose Bakery. I have written the ingredients as listed in the book, and put my adaptations in brackets afterwards. Although the book recommends sandwiching the cake with chocolate or vanilla buttercream, I decided to be a little naugtier, and decided to go for a thick and delicious ganache instead. The plus points of the ganache are that it travels well if you're taking the cake to a party, and as mentioned earlier, it freezes and defrosts rather wonderfully, as long as you wrap it tightly in clingflim first.
 
Extra Special Chocolate Layer Cake
 
Ingredients:
 
For the sponge:
230g dark chocolate, 70% cocoa solids (I used 200g of 50% cocoa solids)
170g unsalted butter, softened
350g light soft brown sugar
3 large eggs, separated, 370g plain flour, sifted
1.5 tsp baking powder
1.5 tsp bicarbonate of soda
0.5 tsp salt
500ml semi-skimmed milk, at room temperature (I soya milk, and only 400ml because my chocolate had a lower percentage of cocoa solids than the original recipe recommended)
2tsp vanilla extract
 
For the ganache:
200ml double cream
250g dark chocolate, 50% cocoa solids
25g butter
 
Method:
 
1. For the sponge, break the chocolate into pieces and melt over a bain-marie, or in a microwave on a low setting. Set aside to cool slightly.
 
2. Cream together the butter and sugar until the mixture is pale and smooth.
 
3. In a separate bowl, beat the egg yolks for several mminuted and then slowly add into the creamed butter and sugar, mixing well. Then slowly add in the cooled, melted chocolate to this mixture, continuing to beat well.
 
4. In a separate bowl, mix together the flour, baking powder, bicarbonate of soda and salt. In a jug, add the vanilla to the milk. Add one third of the flour mixture to the chocolate mixture and beat well, then pour in a third of the milk and beat again. Repeat these steps until all of the flour and milk are incorporated.
 
5. In a clean, grease-free bowl, whisk the egg whites with and electric whisk until sot peaks start to form. Then carefully fold the egg whites into the main batter using a metal spoon.
 
Note: You need to do this carefully so you don't knock all of the air out of your whipped egg whites. The best way to do so, is by gently using a figure-of-eight motion to fold in the egg whites.
 
6. Divide the mixture evenly between two lined 20cm (8-inch) cake tins. You'll need fairly deep tins for this.
 
7. Bake for about 30mins in an overn preheated to 190 degrees celcius (170 degrees celcius fan/gas mark 5).
 
8. When the cakes are ready, leave them to cool in their tins for 10 minutes before turning out onto a wire rack to continue cooling.
 
9. Once the cakes are completely cool, you can sandwich them together and cover in ganache. Add the butter and milk to a saucepan and heat, stirring continuously. When the mixture begins to bubble, remove from the heat. Stir in the chocolate, broken into pieces, and keep stirring until the chocolate has completely melted in.
 
10. Let the ganache cool for about 5 minutes, so that it starts to thicken slightly and is easier to handle. Use a long palette knife to spread a layer of ganache over each of the cake layers. Allow it to soak in slightly, and when it is safe to handle, sandwish the cakes together, ganache sides together. Finally, cover the top and sides of the cake in the remaining ganache and allow to cool and set.


This makes a really rather maginificent and quite grown-up celebration cake that is guaranteed to go down a treat! I have baked this to celebrate my friends' recent engagement, to feed hungry housewarming attendees, and as a 'welcome home' cake. It's genuinely perfect for all occasions!


Sunday, 15 July 2012

Strawberry Milkshake Rainbow Sponge

Last weekend my friend Beth celebrated her birthday with a children's party, which gave me the perfect excuse to make the rainbow cake I've been thinking about. Although this takes a lot of timely and careful preparation, the recipe itself is incredibly simple.

Ingredients:
You will need six 6" square cake tins and six bowls for mixing (small bowls will do). If you have fewer tins, you can re-use them. I used one of these marvellous adjustable tins.

For the sponge:
12oz/330g margarine
12oz/330g caster sugar
6 eggs
12oz/330g self raising flour
3 tsp baking powder
6tsp vanilla extract
6tsp strawberry flavouring
1/2 tsp each of gel food colourings - red, orange, yellow, green, blue and purple

 For the internal buttercream:
(recipe courtesy of Mary-Anne at Time to Cook Online)
This is lighter and less sickly than standard buttercream.
250ml milk
4 tbs plain flour
225g unsalted butter
225g caster sugar
1 tsp pure vanilla extract

For the external buttercream:
This gives a sturdier buttercream for the outside of the cake.
200g unsalted butter
200g icing sugar
1tsp vanilla extract
1tsp strawberry flavouring

To decorate: An assortment of rainbow-coloured children's sweets. The ones on this cake are all suitable for vegetarians (no gelatine or cochineal).


Method:
1. Grease and line your tins. Pre-heat the oven to 180 degrees celcius.

2. In each of your bowls, cream together 2oz/55g margarine with 2oz/55g sugar until light (almost white) in colour.

3. Beat togther one egg with one of the colourings, and gradually mix in to one portion of creamed butter and sugar. If the mixture starts to curdle, add in a little of the flour.


4. Repeat this process, adding coloured egg to as many of the bowls of cake mixture as you will be able to bake in the first batch.

5. Stir in 2oz/55g flour and 1/2tsp baking powder into each of the batches that are ready to be baked, adding 1tsp each of vanilla extract and strawberry flavrouing at the same time.

6. Put each prepared portion of cake mixture into one of the prepared tins and bake for 15-20 minutes at 180 degrees celcius.


7. Allow the baked cakes to cool thoroughly on a cooling rack. Meanwhile, start preparing the internal buttercream. Whisk together the milk and the flour in a pan on the hob until the mixture thickens. Continue cooking and stirring for another minute to cook out the flour.

8. Pour the mixture onto a plate and cover closely with clingfilm so that a sking does not form. Allow to cool completely.

9. Beat together the sugar and butter until creamy and pale in colour. Add the milk mixture when it is completely cooled, and the vanilla extract. Continue wisking until the mixture is pale and thick.

10. Sandwich together the six layers of cake with the internal buttercream, starting with the purple on the bottom, and working up to a red top layer.

11. Prepare the external buttercream: Whisk together the butter and icing sugar until very light and pale in colour. Whisk in the vanilla extract and strawberry flavouring.


12. Cover the outside of the cake with the external buttercream and decorate with the colourful sweets.


Try and keep the exciting insides a secret, and wait for the gasps of excitement when the recipient finally cuts the cake!

Friday, 15 June 2012

Everyone's a fruit and nut case!

Perhaps controversially, my Dad has always been a major fan of Cadbury's Fruit and Nut. Probably not the most popular of the Cadbury's range (I'm a fan of their Turkish delight, myself), but there's certainly a time and a place for it. And given that he will be celebrating his birthday this year with a trans-Atlantic adventure, we had a pre-birthday celebration before he left, for which this themed cake was created. Anyway, this week is his actual birthday, so it seems an appropriate time to post the recipe.

The best thing about it is the texture. It's so fluffy and light, you'd almost think I had cheated by injecting it with some of the more disgusting fats and gelatines favoured by many of today's cake manufacturers. But rest easy, this cake is made of all good stuff. In fact, my Dad's verdict was that "This is the best birthday cake I've ever had". Not bad, given that it's his 80th!


Trip layered chocolate, fruit and nut cake
Serves 6-8
You need 3 x 8" sandwich tins (I only have two so I reused one, mixing a third of the mixture after the first two were in the oven!)

Ingredients:
4.5oz/125g caster sugar
1.5oz/40g muscovado sugar
6oz/170g baking margarine (Stork)
3 eggs, beaten
4.5oz/125g caster sugar
1.5oz/40g cocoa powder
1.5oz/40g ground almonds
a splash of milk (I used Alpro)

For the Buttercream:
2oz/55g baking margarine (Stork)
2 tablespoons cocoa powder, sieved
2 tablespoons icing sugar, sieved

To decorate:
raisins, chocolate chips, chopped nuts

Method:
1. Cream together the sugar and the margarine until light and fluffy.

2. Stir in the beaten egg, a little at a time, mixing thoroughly.

3. Stir in the flour, cocoa and almonds, and add a splash of milk if the mixture isn't wet enough.

4. Divide the mixture equally between your tins and bake at 180 degrees celcius for about 15-25 minutes. Leave to cool on a wire rack.

5. For the buttercream, cream together all of the ingredientsroughly, then whisk with and electric whisk until light and fluffy.

6. When the cakes are totally cool, sandwich together with the buttercream, spread a layer of buttercream on the top and decprate with fruit, nuts and chocolate.

Everyone's fruit and nut case... triple layered chocolate, fruit and nut cake

7. Scatter it with as many candles as it can safely hold, sing the birthday song at the top of your voice, and enjoy!

Sunday, 15 April 2012

Through the looking glass...

This week saw the 'final project' of my cake decorating class. Having been ridiculously excited about this for weeks and weeks, I may have come up with a slightly over-ambitious project. In the end, it took longer than the two-and-a-half hour session to decorate this cake (quite a lot longer, actually!) but I got the chance to create the semi-gothic wonderland I've been dreaming about since the project was announced, and which has resulted in 'research' in the form of Tim Burton's Alice in Wonderland, and much time spent on google images.


Mel hosted a 'cake unveiling' yesterday, with the hope that, with help, we could limit the calorific damage of two gargantuan sugarpaste creations. However, even with the best efforts of friends and colleagues, we barely made a dent in the mountains of cake required to support the sugarpaste creations.

Ah, well. It'll be cake all round in the office next week...


Alice in wonderland cake/
White chocolate and raspberry rainbow cake with white chocolate buttercream

10" cake - provides about 30-40 servings.

Ingredients:
500g margarine (I used Stork)
500g caster sugar
500g self raising flour, sifted
250g plain flour, sifted
9 large eggs, beaten
1 tsp vanilla extract
1 orange - zest only
multicoloured sugar sprinkles
100g white chocolate, roughly chopped into chunks

For the filling:
4 tblsp raspberry jam.  I used raspberry and vanilla jam by Relish. Pricy but scrumptious!

175g unsalted butter, softened
500g icing sugar
90ml milk/soya milk
1tsp vanilla extract
200g white chocolate

To decorate (optional):
1kg sugarpaste icing, to cover (optional)
Plus extra for decorations of your choice

Method:
1. Grease and line your cake tin, and wrap four of five layers of newspaper around the outside of your cake tin. This will help it to bake evenly, without the outside edge burning.

2. For the cake, cream together the margarine and sugar until the mixture becomes creamy and white.

3. Gradually stir in the egg a little at a time. If the mixture begins to curdle, add in a little of the flour (a tablespoon at a time) to stop this happening. Keep adding the egg, little by little.

4. Coat the white chocolate chunks in some of the flour, and gradually mix in the remaining flour, white chocolate and orange zest. At the last minute, stir in the coloured sugar strands. These will give the inside of your sponge a rainbow effect. Spoon the mixture into the prepared tin, leaving a big hole in the centre. This will fill itself in as the cake rises.
5. Bake the cake at 160 degrees celcius (145 degrees celcius if it's a fan oven) for about 2-2.5 hours (checking after an hour and three quarters). Pop a bowl of water on the bottom of the oven as you bake, as this will help the cake to retain moisture. Also, put a baking sheet on the shelf on top of the cake, to protect it from the heat a little. If you feel the cake is browning too much on top, you can cover it with tin foil. The cake is done when a skewer inserted into the middle comes out clean.

6. When the cake is completely cool, you can trim it to ensure it is completely flat (the trimmed top will be made into the bottom of the cake), slice it in half and prepare the filling. Gently heat the white chocolate in a bain marie until it is completely melted. Set it aside to cool slightly as you prepare the rest of the buttercream.

7. Whisk together the butter, icing sugar and vanilla extract wth a hand whisk. Gradually pour in the milk as you are whisking, but take care not to overwhisk the mixture. Pour in the cooled, melted white chocolate, and stir with a spatula until mixed together. Then whisk until the buttercream has a light, fluffy consistency, adding a tablespoon or so or extra milk if necessary.

8. Spread the raspberry jam on one half of the cake, and spreadthree quarters of the buttercream on the other half. The place the two halves together, buttercream and jam facing inwards.

9. Use a palette knife to spread the rest of the buttercream around the top and sides of the cake. If you are not using sugarpaste, then sprinkle with some multicoloured sugar strands and serve. Otherwise, the buttercream gives a smooth surface for your sugarpaste icing to stick to.

10. If using sugarpaste, roll out to the desired thickness and cover the cake, smoothing carefully. This cake will keep in an airtight container in a cool room for a good week. Do not keep it in the fridge, or the chocolate in the buttercream will set like concrete!

The hot day was making Alice feel sleepy...


 "Oh dear, I shall be too late!" exclaimed the white rabbit.
"Why is a raven like a writing desk?", asked the hatter.
"Off with their heads!"


"You're nothing but a pack of cards!", cried Alice...


... and she found herself lying back on the bank...


... so she closed her eyes, and half believed in wonderland.